
Create Table Within Two Steps In Blogger
So, today we are here with a unique idea to keep Table in Blogger. You can export a table created in Microsoft word in to blogger with very easy steps. Mainly we are discussion on the two parts. First part is Drawing Table on Microsoft Word and the Last part is Exporting the Table made on Microsoft Word to Blogger. So, let's start with the first part.
Step #1 Draw Table on Microsoft Word.
If you are using Microsoft word then creating a table for you is very simple. In the Second tab i.e
Insert You will find Table. Choose row and column as your requirement. For this tutorial we have used 3 by 3 Table. See below Screenshot
The table you have created will be in white background and black border line by default. You can manually change its design for eye catching looks. In the
Table Tools Tab you can find Design choose your design. See below Screenshot if you got confusion.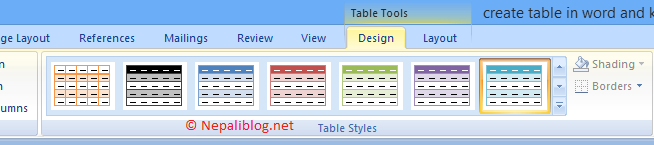
You have created a table in word i.e First Step Completed.
Step #2 Import Table Created in Word to Blogger
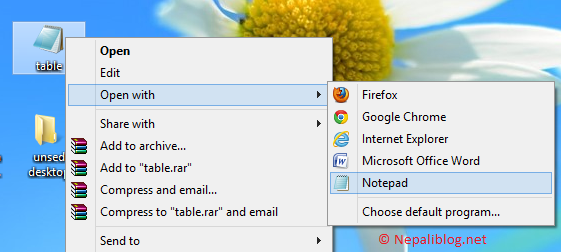
In order to put Table in Blogger, you have to get HTML code of table. For this use File >>save As >> Choose Web Page, Filtered from the Drop down Menu. Give the name of file and save it in desktop.
If you got any confusion see the Below Screenshot.

Right click on the file name (Which you have recently created in Microsoft word) and open it with notepad.
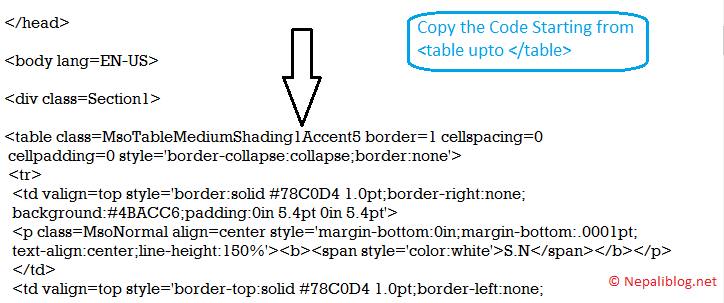
You will find list of code. You do-not need all of them only a part of this code is needed. So use CTRL +F and find
<table copy it reach </table> Use Ctrl +C and Paste it to Your blogger Post Editor.
Note : In order to keep table switch Your Post Editor to HTML view.
Create Table Within Two Steps In Blogger
 Reviewed by Pawan Paudel
on
8/23/2013
Rating:
Reviewed by Pawan Paudel
on
8/23/2013
Rating:
Reviewed by Pawan Paudel
on
8/23/2013
Rating:
nice.. Thank you
ReplyDelete