
Blogger Contact Form Widget-How to use in Separate Page?
 Bloggers are expecting something missing since a long time, that is no other then the Contact Form. Finally Blogger introduce Contact Form Widget Officially this week. Now no need to depend upon the third party code or google docs to create form for blogs.
 Before this Widget many Blogger use Google Docs Form for contact form in blogger. NepaliBlog also used same. Now no need to depend on the Google Docs. Its a great achievement for bloggers. Since this is in initial stage need more modification.
Missing A lot.
Since this is widget which can be kept on the right or left sidebar, also in Bottom at footer. But many bloggers want to keep in separate page. We can also keep it in page after some HTML Tweeks Admin of Bloggerplugins. +Aneesh Joseph Wrote a post about this.
Many things are lacking in this widget. NepaliBlog list out some of the Drawbacks.
Many things are lacking in this widget. NepaliBlog list out some of the Drawbacks.
- No option for File Attachment.
- No Captcha So chances of Spam Mails.
Blog Admin cannot Notice the Email address of senders and their IP address. Contact Message will come from no-reply@blogger.com. We cannot reply them.
New Improvements
+Blogger has got some improvements. We can see the email address of Sender.
How To Install This Gadget in Blogs.
In order to install this Gadget in Blogger
- Login Blogger
- Go to Layout.
- Add A Gadgets (Where You want to Keep Contact Form Widget)
- You cannot find on the Basic So click on the More Gadget (As shown in Figure Below)


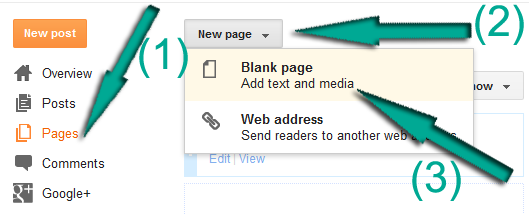
To Keep It in Separate page Follow the Steps.
If you want to keep it on separate page then it will not show in sidebar. Create a New Blank Page (See the Below Screenshot)
New Page will Open , Go the HTML Edit menu and copy the below code and paste on it.
<form name='contact-form'>
<div>Your Name : </div>
<input class='contact-form-name' id='ContactForm1_contact-form-name' name='name' size='30' type='text' value=''/>
<div>Your Email: <em>(required)</em></div>
<input class='contact-form-email' id='ContactForm1_contact-form-email' name='email' size='30' type='text' value=''/>
<div>Your Message: <em>(required)</em></div>
<textarea class='contact-form-email-message' id='ContactForm1_contact-form-email-message' name='email-message' rows='10'></textarea>
<p></p>
<input class='contact-form-button contact-form-button-submit' id='ContactForm1_contact-form-submit' type='button' value='Send'/>
<div style='text-align: center; max-width: 450px; width: 100%'>
<p class='contact-form-error-message' id='ContactForm1_contact-form-error-message'></p>
<p class='contact-form-success-message' id='ContactForm1_contact-form-success-message'></p>
</div>
</form>
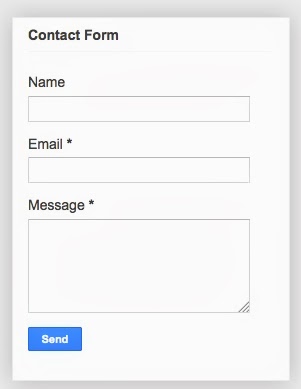
Click on the Compose you will find the Contact form as shown in the first image.
Remove it from the sidebar.
After adding Contact form in Separate Page. No need to keep it on Sidebar. Remove HTML Code Related to Contact Form.

You will see the code like this
<b:widget id='ContactForm1' locked='false' title='Contact Us' type='ContactForm'>
click on the  arrow delete the below portion of code. from this. and Delete the Portion given below.
<b:if cond='data:title != ""'> <h2 class='title'><data:title/></h2> </b:if> <div class='contact-form-widget'> <div class='form'> <form name='contact-form'> <p/> <data:contactFormNameMsg/> <br/> <input class='contact-form-name' expr:id='data:widget.instanceId + "_contact-form-name"' name='name' size='30' type='text' value=''/> <p/> <data:contactFormEmailMsg/> <span style='font-weight: bolder;'>*</span> <br/> <input class='contact-form-email' expr:id='data:widget.instanceId + "_contact-form-email"' name='email' size='30' type='text' value=''/> <p/> <data:contactFormMessageMsg/> <span style='font-weight: bolder;'>*</span> <br/> <textarea class='contact-form-email-message' cols='25' expr:id='data:widget.instanceId + "_contact-form-email-message"' name='email-message' rows='5'/> <p/> <input class='contact-form-button contact-form-button-submit' expr:id='data:widget.instanceId + "_contact-form-submit"' expr:value='data:contactFormSendMsg' type='button'/> <p/> <div style='text-align: center; max-width: 222px; width: 100%'> <p class='contact-form-error-message' expr:id='data:widget.instanceId + "_contact-form-error-message"'/> <p class='contact-form-success-message' expr:id='data:widget.instanceId + "_contact-form-success-message"'/> </div> </form> </div> </div>
So the final code should be like this.

Happy Blogging.
Blogger Contact Form Widget-How to use in Separate Page?
 Reviewed by Pawan Paudel
on
5/20/2013
Rating:
Reviewed by Pawan Paudel
on
5/20/2013
Rating:
Reviewed by Pawan Paudel
on
5/20/2013
Rating:
Wow!! its works good....thanks
ReplyDeleteThank you! This is very helpful.
ReplyDeleteThank you for Guide me use the form Examguide97
ReplyDeleteeasy .. perfect ... many thanks
ReplyDeleteI was searching for contact form , and I finally found it,
ReplyDeleteThanks a lot admin.
widget really work very fast. From now bloggers can contact easily thanks to the Widget contact form.
ReplyDeleteDownload Free Movie Online, Surely Good Sources
I like your Blog that is Neat and Clean. Nice post ! keep blogging. I am new in blog field so please visit my blog and feed back me please.
ReplyDeletehttp://jnawalivinod.blogspot.com
Vinod
Very good post, keep up the good work... SORT OF INFORMATION
ReplyDeletei have not found the contact form in widget drop down menu so plz help me
ReplyDeleteIt is not in basic gadgets but in more gadgets go to more gadgets and if you still don't find it then search for in the search bar :)
Deletei have not found the contact form in widget drop down menu so plz help me
ReplyDeletehttp://engineering-figures.blogspot.in/
Thaks to you alot
ReplyDeletePerfect!
ReplyDeleteThanks to this article!
ReplyDeleteI was able to make a contact form for each item of my blog just under blog body.
↓
http://blog.kita-o.com/2015/07/blogger.html
I put and some data to textarea ,
This is so good for usability to get reaction of customers.